A place for you to learn, get inspired, and keep up to date with all things SmugMug and photography


Photographing remarkable landscapes, extraordinary cultures, and exotic animals in foreign locations is a dream for many, and the good news is that you don’t have to travel to find scenes and subjects that are worthwhile. By being creative and planning ahead, you can capture captivating photos no matter where you live.
You can try out new photography skills like forced perspective, push yourself to document local cultural events, and test your patience at the local zoo. Here are a few ways you can begin taking dream photos without hopping on an international flight.
You don’t have to fly to China to capture a stunning lantern festival: many major cities in the U.S. have their own, including Philadelphia, DC, San Antonio, and San Francisco. There are also traveling exhibits that visit different locations across the country to showcase this cultural phenomenon. Don’t live near a major metropolitan city? Still not a problem!

You can order the supplies online (think Amazon and Etsy) to build the lanterns yourself and set up your own version of the festival at home. Gather some friends and head out to a nearby lake or field to release the lanterns and take photos. If you want to practice your skills with composite photography and editing, stage shots that will work well together, like the city landscape at night with lanterns floating above, or the lanterns in the sky with a reflection in the lake below.
It might be worth reaching out to a local school or cultural organization that is already interested in this subject matter. You can join forces to make it a bigger event, meaning more lanterns and more varied subjects for you – not to mention great images for the organization or school.
Interested in other cultural touchstones? Check out local museums to see what exhibits are coming through. There might be traveling exhibits featuring Mayan ruins or Egyptian tombs, and sometimes they style an entire room or wing to create a life-size diorama. Plan a trip to visit during non-peak hours and you’ll literally have the world coming to you! But make sure to get permission to shoot photos, as many museums have rules against or limiting photography.
Forced perspective is a powerful tool photographers can use to create wild and wonderful shots from the comfort of home. By angling a toy car just right, or setting action figures close to your lens, you can make them look life-size. By setting the angle of your camera perfectly, modern buildings can seem set in another time period, and cropped images of local landscapes can look like a scene you’d see in a foreign country.

Visit a local gardening center to find non-native plants like ferns and palm trees. Use these to create a photography set that resembles the destination you’ve always wanted to photograph. It can help to find specific inspiration images online, paying attention to the plants, animals, and colors of the areas. Build the scene and have fun incorporating figurines of various exotic (even mythical!) creatures or castles and other fantasy props. By playing with angles, spacing, and depth of field, you can make them look real!
There are an estimated 400+ zoos and animal parks in the U.S. and 251 are currently accredited by the Association of Zoos and Aquariums. This means you’re closer to exotic animals than you think, and many of these establishments allow photography. It might not provide the same sense of adventure as an African safari, but you may be able to get behind the scenes by bartering services for access.

Some zoos offer tours for photographers during off and morning hours, so look at their website and check special events pages. If your local animal park doesn’t have them, see if you can negotiate a special visit—feeding hours can be especially exciting! You can always offer the images for use in their advertising and marketing materials in exchange for the trip. You never know, they might turn into a regular client.
If you find the right person and they like your work, there’s a chance they will let you come in with a guide. You’ll be able to capture print-worthy shots of the animals without having to travel to their native lands, and the animal park will get access to pro-level photos they can use to help bring awareness and customers to their parks. It’s a win-win situation.
We can’t always travel to dream destinations for our photography, but that doesn’t mean we can’t create dream photos. By using the resources and locations where you live, you can create similar scenes and capture the magic until you're able to visit the real deal.

Have you ever noticed that some of the most impactful images feature a contrast of some kind? Maybe it’s the use of contrasting colors or two elements that seem to oppose yet complement each other simultaneously. These images use an element of composition called juxtaposition; if you’re looking to create strong and compelling images, you’ll want to master this practice.
Juxtaposition is placing two or more objects or concepts close together to contrast them or create an interesting effect. For example, a photo showing a sunny, green field backed with a black, stormy sky juxtaposes both color and weather. Juxtaposition often occurs naturally in shots but can also be created by strategically staging the scene.
Knowing how to identify juxtaposition naturally will help you compose your images and take stronger photos. Using juxtaposition isn’t just about having contrasting elements in a photo; it’s also about the story those elements tell.
Let’s look at some examples of photos that use juxtaposition effectively.
The best way to learn about using juxtaposition is to see some examples of how it can be used. Here are photos where contrast is created in a variety of ways. Sometimes contrasting colors are used, while other times the subjects tell contradictory stories.
1. Modern versus old architecture. This photo uses the contrasting architectural styles of the buildings to create juxtaposition.

2. Contrasting concepts. This photo shows a contrast between the ancient stonework and the ultra-modern smartphone.

3. Death versus life. This photo not only has contrasting colors but contrasting subjects as well. The bright, vibrant flower is juxtaposed with the dead bloom.

4. Large versus small. The comparison between the looming, out-of-focus buildings in the background and the sharp, tiny bird in the center of the frame make a perfect juxtaposition of size.

5. Old versus young. This is a contrast that evokes emotion showing both the early stages of life and its later days.

6. Natural versus man-made. This composite image juxtaposes natural and man-made objects, combining them into one image.

7. Wealth versus poverty. A powerful juxtaposition often used for social commentary. It makes the viewer stop and think, evoking an emotional response.

Juxtaposition is all around. Learning how to see it and use it will help you to create images that are not only beautiful but powerful as well. Using contrasting elements can create images that tell stories and give more meaning to your photos.
Event photography seems simple enough: Your job is to take photos of a special occasion. Where it gets tricky is in reflecting the actual experience from the participant’s perspective, whether it’s a professional conference for business owners, a product launch cocktail hour, or a wedding’s late-night dance party. Of course, the basic lighting techniques still apply for every event—adjusting shutter speed, aperture, and ISO for correct exposure—but utilizing the advanced lighting techniques listed below can take your event photography from pretty good to print-worthy.
As part of your pre-shoot preparation, think about the vibe and location of the event itself, as well as who the participants are, then plan some shots accordingly. For example, formal events (trade shows, conferences, business meetings, speaking events) might require crisp, clean images that reflect the scene as accurately as possible, while more personal events (weddings, family reunions, cocktail parties) might allow for an artistic approach and more experimentation. Communicate with your client about their expectations, and how your photographic style and vision for the event will fit.

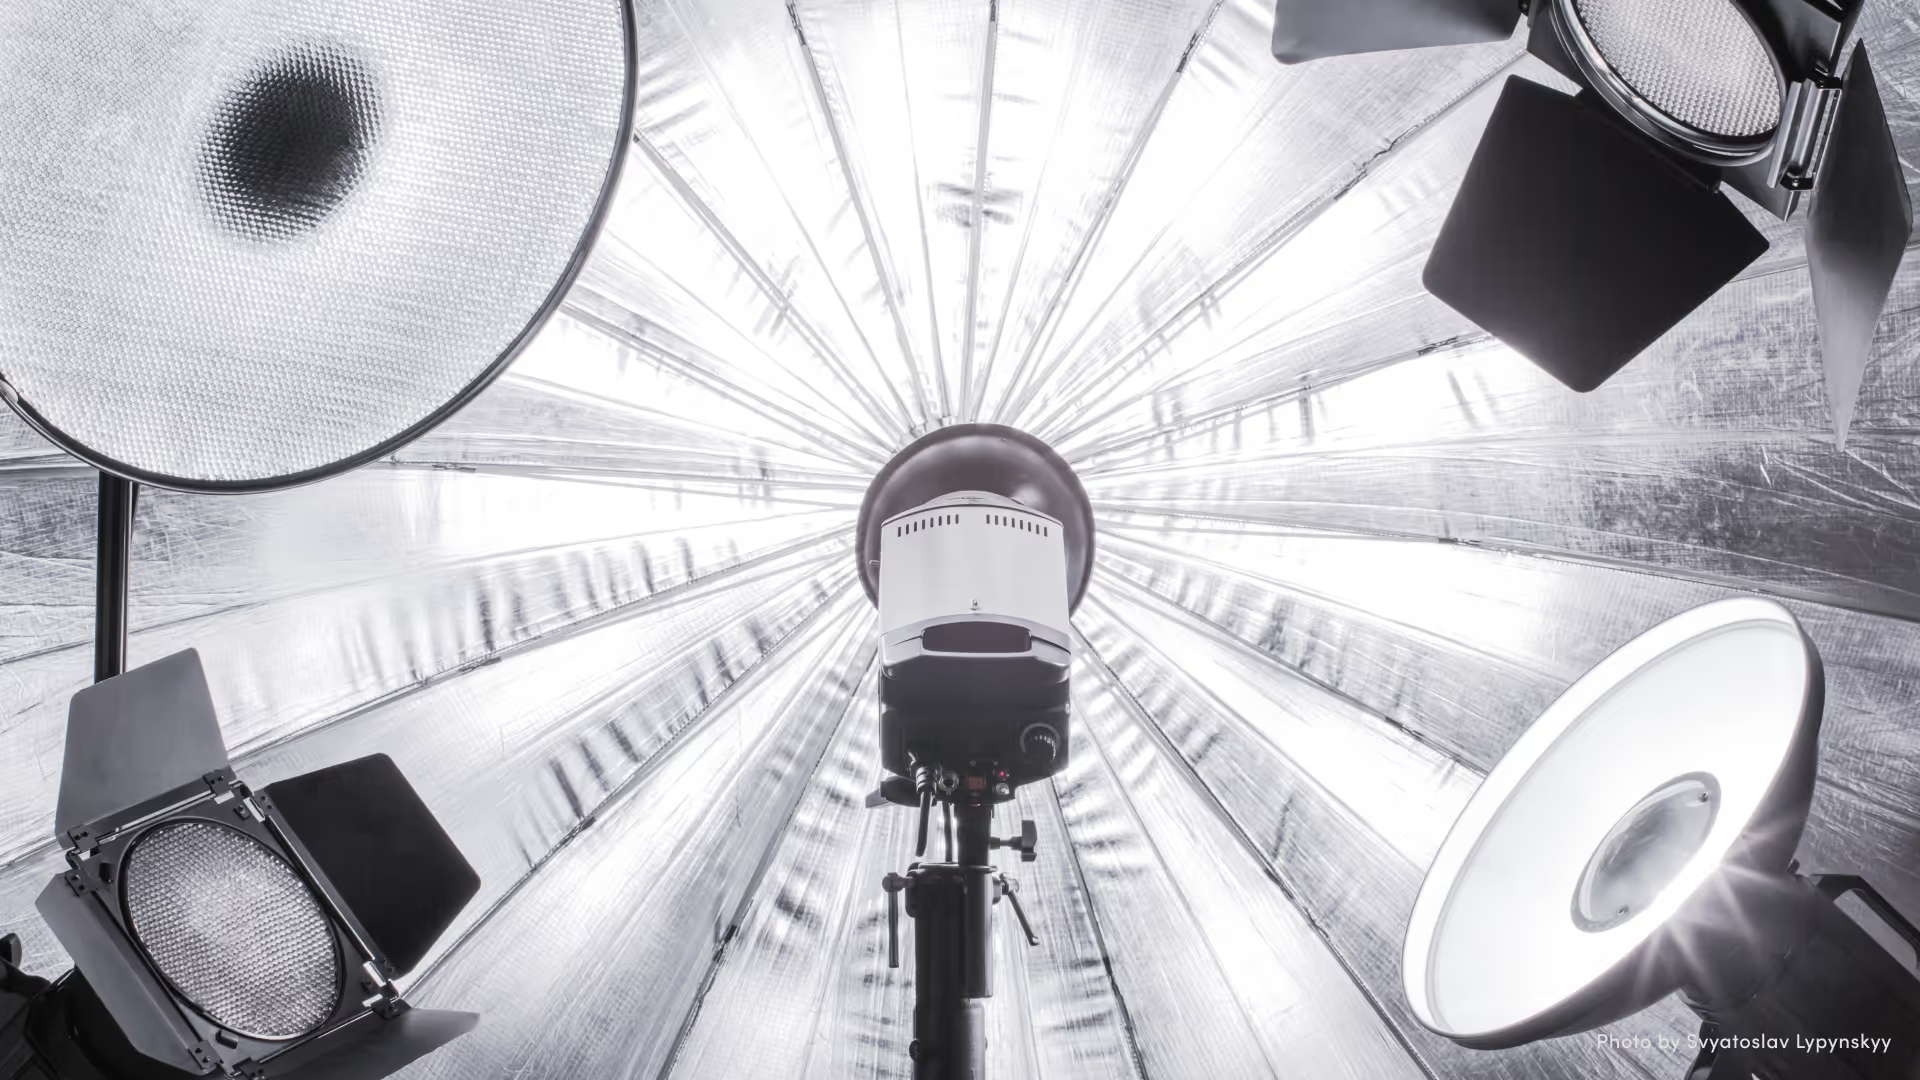
The sun, windows, streetlights, tabletop candles, colorful strobes, a stage spotlight, lamps, sparklers, neon signs, and overhead lights can all be used on their own to create interesting exposures. Look up images of the venue and talk to the client about what ambient light sources there will be, and have an idea of how you might utilize each of them.
One important advanced lighting technique is knowing how to balance artificial lighting with the ambient lighting of any given scene. For a sunset cocktail hour, you might use a soft flash to highlight people having a good time while preserving the rich colors of the sky in the background. A live concert might require direct flash on the lead singer to freeze her jumping in mid-air, but with a slow enough shutter speed to include stage lighting that highlights her bandmates.
There are countless options when it comes to supplemental lighting for event photography, but what’s most important is thinking through what the pace and location of the event will be, then picking out appropriate equipment for the event. Will you have an assistant to operate an off-camera flash, or are you on your own? Is the event fast-paced with unmissable moments, or is it a bit slower with more time to set shots up and play with lighting?
In addition to those factors, make sure you have full mastery over whatever lighting equipment you’re using. Event photography is all about real people (not models!) experiencing one-of-a-kind moments, so you’ve gotta be ready and have all your settings dialed for those split-second opportunities.
Pro-tip: Once you have the external flashes, practice photographing friends in a space similar to the event so you are ready for the big day.

One advanced lighting technique for event photography is to utilize multiple external flashes to provide a key light and fill lights for specific exposures. Knowing how your flashes can work together to layer the light in a frame will take your imagery to the next level. Here are a few things to consider with artificial lighting:

With event photography, you have the benefit of being present for a special time in a person’s life—after all, it’s an event that stands out so much from daily life it warrants hiring a photographer! You’re there to document the people, the place, and the moments in a cohesive way that reflects the feeling, meaning, and importance of it all, beyond simply taking photos. Event photography is a great example of the whole being greater than the sum of its parts. Great event photography captures the essence of the experience, not just the facts.

Here are a few last ideas to try: silhouetting people against a bright background (look for interesting body positions), using a slow shutter speed for motion blur in the background with a flash to freeze the action of the subject, and painting with light (slow shutter speed + moving light source) to highlight a place setting or write something meaningful (like a wedding date + the couple’s initials). Be creative and think outside the box for how you can use advanced lighting techniques, and you’ll create images your event photography clients will cherish for years to come.

Renowned photographer Henri Cartier-Bresson once said your first 10,000 pictures are your worst, but we gathered a few tips from pro photographers to make the journey to honing your craft a little quicker.
Here are the top tips from pro photographers:

Without delving into details about optics and light paths, your lens has a sharpest point within its aperture range. The largest and smallest ends of that range are the softest, and f/8—which is in the middle—is where you’ll most often get the sharpest images. This does vary by lens, so we recommend shooting some test shots to find your lens’ sweet spot. Once you’ve got that dialed in, experiment at different apertures to see how each f-stop affects your image.

In the world of photography, you have probably heard a lot about getting the image right straight out of camera, or SOOC. And there’s wisdom to that thinking. You don’t want to “fix it in post” if you can save yourself time by getting the shot right in-frame. But cropping your photo after the fact to create a better, stronger composition is a quick and easy way to improve an image after it’s taken.
Maybe there was a fence in your way that prevented you from getting closer to the shot, or perhaps you were capturing a split-second street shot and didn’t have time to change your lens. Either way, it’s your artistic decision to improve a composition with a little post-process cropping. And unless you tell someone you cropped, no one will ever know! Consider it a trade secret.
Pro Tip: You don’t have to crop your photos before you upload them to SmugMug. Use built-in photo tools to crop your images, or copy a photo and crop the copy so you can compare it to the original and see which you like best.

You don’t have to own the gear to shoot with the gear. Can’t afford to drop $16K on an 800mm lens to shoot the next game? No problem: pay a pittance to rent one for the time you need, then send it back and call it a job well done. This is also a great way to test out new gear you might be considering for your full-time kit. Not sure if that 85mm f/1.2 is worth the extra dough? Rent it and try it out. A small upfront investment can save you a big financial headache down the line.

While getting photos right SOOC (straight out of the camera) is good practice, it’s rare that a photo looks better unedited than edited. Even a perfectly-lit, powerfully-composed photo can benefit from a few finishing tweaks to the white balance and saturation to make it pop—especially if you shoot in RAW. Think that sunset shot couldn’t get any better? Give it a boost in post and see what happens.
Pro Tip: You’ve got color effects available in SmugMug's photo tools. Or you can take your editing a step further with Lightroom and publish the results directly to SmugMug without ever leaving the program.

Backlit subject? High-contrast sunset? White dress, red wall? These scenarios (and countless more) can throw a wrench into your shoot, but you can still capture the photos you want with practice. Study hard, stay inspired, experiment, and make mistakes—lots of mistakes. Then learn how to fix them. Try using a fill light for that backlit subject. Experiment with a neutral-density filter during that sunset. Move your model or your lights farther away from that red wall. Discovering what doesn’t work will help you learn what does work, and will result in better photos—and technique—in the future.
Pro Tip: You’re not alone! Chances are another photographer out there has run into the same challenge you have. If you’re struggling to find a solution, don’t hesitate to consult the Internet for answers. SmugMug also has some great resources in the Development Lab.

As a real estate photographer, you have more opportunities to add money to increase your revenues than a lot of other professional photographers: your network is made of professionals who have consistent demand for quality photography, plus a client base of consumers that may want to commemorate their new home.
Whether it's the middle of the slow season and you’re looking for new revenue streams or you’re trying to increase sales year-round, here are some out-of-the-box ways you can use your skills and network to grow your photography business.

Both the buyer and seller agents will likely be purchasing a closing gift for their client. And they’ll want to keep their brand front and center for their next purchase, sale, or referral. A gorgeous photo of the home they just helped buy or sell could be a great way to do both!
You’re photographing the property and already have a relationship with the seller’s agent, so why not show up at golden hour and take a couple of gorgeous photos of the home? Show the agent what your photography skills can do, and offer to make their clients some framed prints as a gift. As a bonus, this gets your photography in front of happy new homeowners who might have non-real estate photography needs in the future.

Agents either stage the house themselves or hire interior designers. Either way, they’re going to need art and furniture. If you see the staging, why not bring your photography portfolio on your iPad or phone and show how your artwork from non-real estate photos amplifies the experience of touring the home?
Then, in exchange for them getting high-quality photos, you can ask them to list your name and contact info by the photographs, or place your business cards as the artist by the sign-in sheet for the open houses.
The added benefit here is that you’ll be in front of home buyers that will need to decorate. Even if they don’t buy that house, you’re getting free exposure to an audience who will potentially be upgrading their living spaces and in need of new art in the near future. Offer the home buyers a business card where they can find your portfolio. Create a gallery for “Open House Art” so they know where to find the photo(s) they were drawn to on display.

When photographing a property for listing, find out who the vendors that worked on the house are.
Each of these companies has to advertise, update portfolios, and showcase work samples, and many forget to do this regularly. While you’re taking photos, snap a couple pro shots with these vendors in mind. (This could be updated patios, the staging of the home, and even a nicely trimmed lawn with flowers.)
Process the photos (and remember to add your watermark for protection), then send sample images to the respective companies along with a link to your portfolio.

Some real estate photographers like to create creative and evocative images within the homes they’re hired to shoot. As long as there are no restrictions in your contract, why not take advantage of a beautifully staged home for some fine art photography?
Show up for golden hour to capture natural light coming through a window, or a scenic sunset over the back yard. Work on your food photography with that beautifully renovated kitchen as a backdrop. Your options are endless.
Making money with real estate photography doesn’t end with snapping photos of the house—it becomes a lead magnet for you to earn revenue in multiple ways. And if you’re not currently securing your images from theft and selling prints, give SmugMug a try for free by clicking here.

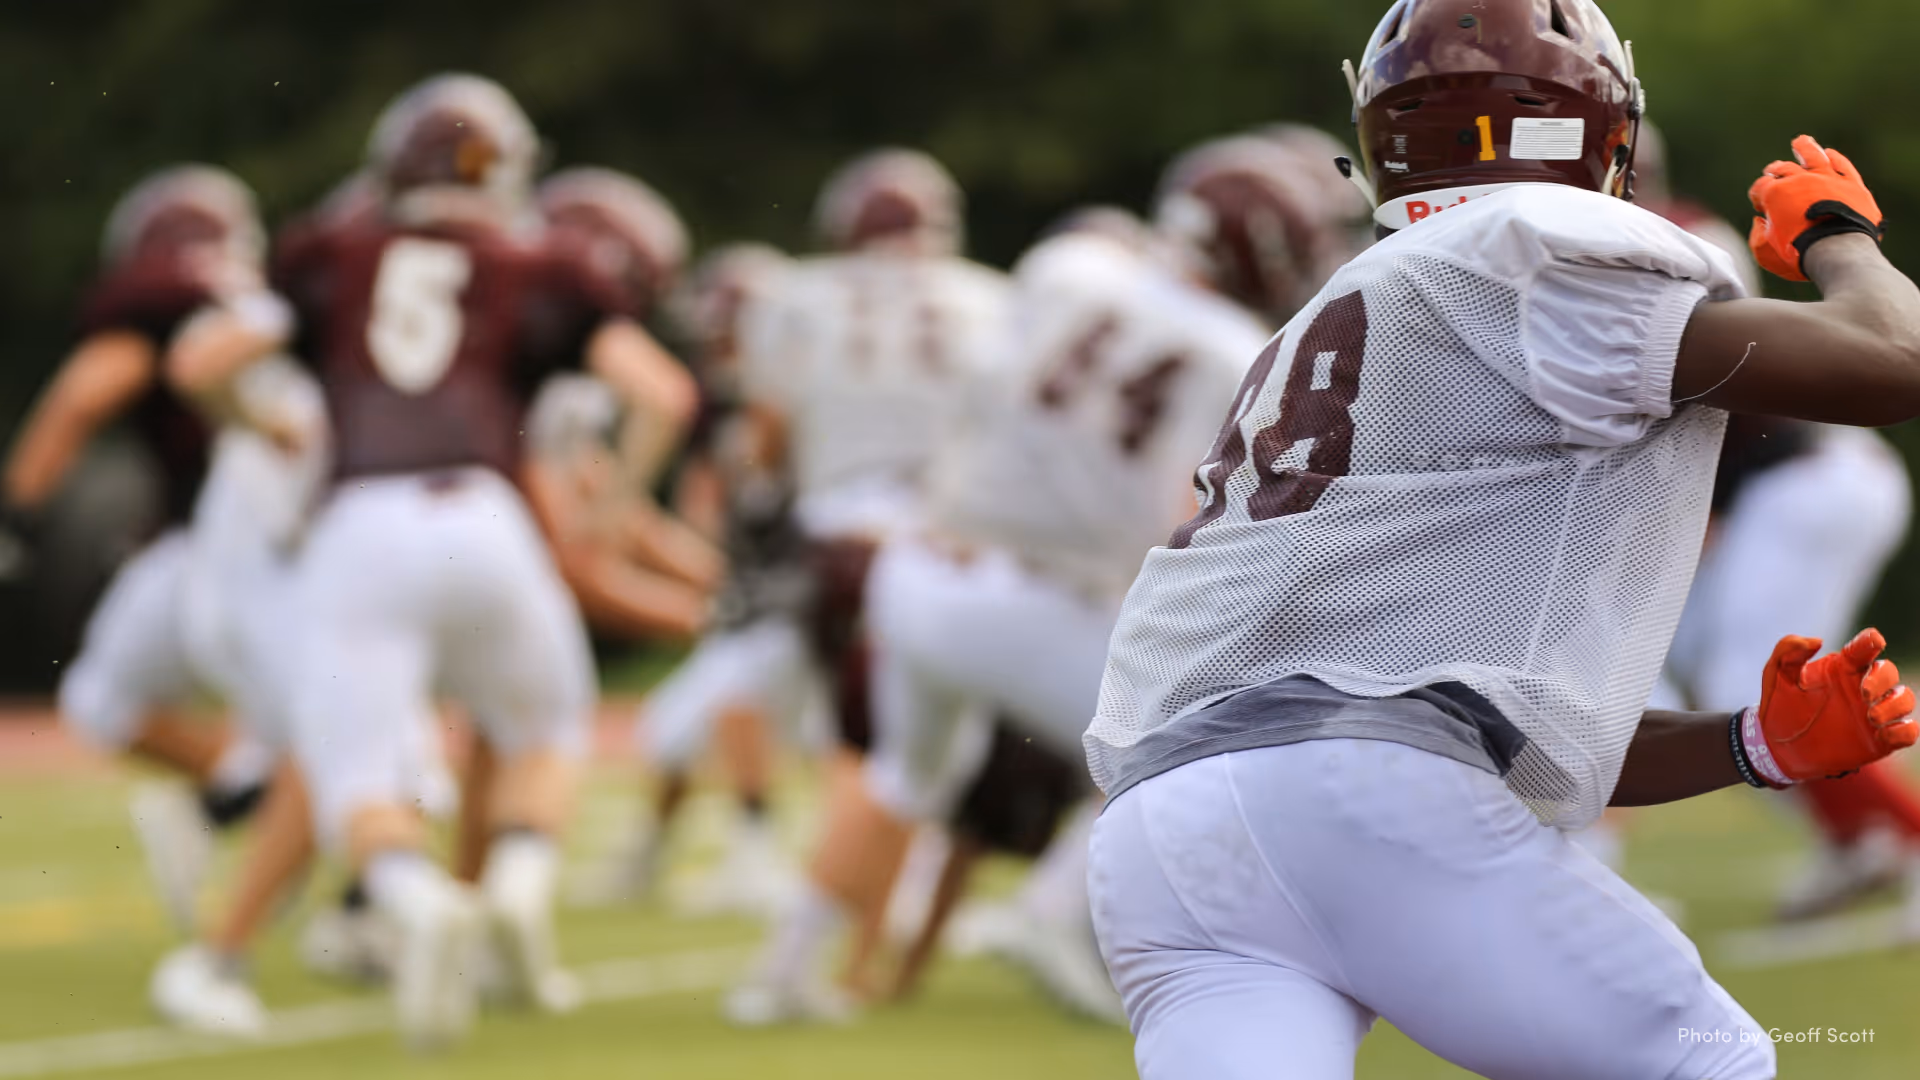
Sports photography is about capturing “the moment” and all of the raw emotions that come with it. Whether the moment is a loss, a win, a goal, or a save, sports bring out the full spectrum of human emotion. There’s passion and intensity with every move, so it's important to be ready to “tackle” everything that comes your way.
Below you’ll find 6 things to know and keep in mind that will help you capture the perfect sports photography shots, whether you’re wanting to immortalize your kids’ tournaments, sell to sports fans, or you’re simply doing it for the love of the game.
The right camera mode and settings are crucial for all forms of photography, but maybe even more so for the fast-paced world of sports photography, where every second counts. The most important settings and functions to understand and know how to use when shooting motion are aperture priority, burst or continuous shooting mode, shutter speed, and ISO.

You’re likely already watching videos of the sport you’re about to photograph, but have you considered going to YouTube, TikTok, and Instagram to study videos of key players, and to get a better understanding of the game? By watching videos the athletes post of themselves, or that fans post from the sidelines, you can learn what parts of the game are important and worth looking out for.
Being familiar with the game is important. Without knowing the game, you won’t know where to stand or what the right angles are—and knowing the behaviors of the players themselves will give you a better chance at knowing where to be at the right time.
Professional photographers adjust and shift depth of field with muscle memory, but not all of us are pros. And even pros can be caught off-guard with sports photography because they cannot control where athletes are on the field, how a coach instructs their team members to form, or when a cyclist is about to sprint. They could want the subject in sharp focus and the audience in the stands blurred, but another object coming across their path will throw the entire capture off.
The first step is to create a list of situations with shots you’d love to capture, and the depth of field required as the scene could change. Next, watch team practices and scrimmages to get a feel for the distances you’re photographing at. Last is to set up at a location with tons of unknowns (local tracks are great for this) to get some practice adjusting your depth of field in real time.

If you don’t have an extreme team sports venue like BMX tracks or roller rinks, head to a location where the captures on your list could happen and see if you can develop muscle memory to hit the exact depth of field.
Depth of field and sports photography take practice, and when shifting camera settings becomes second nature, your photography will climb to new levels.
Much like the athletes themselves, being prepared for game day as a photographer is all about practice, practice, practice. Get a couple of friends to rehearse some specific plays and moves for you, and experiment with your positioning and angles while they “play.”
Now position yourself about the same distance from where you’ll be when you’re at the event, and try capturing the right moment without knowing what they’ll be doing.
Stadiums, coaches, and even players may ban flash photography from sporting events. Flashes can distract the players and negatively affect the game, not to mention it’s an extra piece of equipment that can delay your ability to capture the action quickly. See if you can visit the arena, track, or venue during events with the same types of lighting that will be available when you’re there, and practice shooting with the ambient light available.

Photography is full of surprises, and sports photography is one of the most surprising subjects to shoot. Someone could dive for a catch, or spring higher off a trampoline because of adrenaline, or launch further from a platform. Look for “action angles” where you can capture the distance, height, or a measure point to drive home the impact of the moment.
Try lowering your tripod or taking a shot from the ground up. See if you can access the roof and focus downwards to the field. Maybe you noticed a signature emblem or static team memorabilia like a championship flag in the background, and the athletes will be crossing by during the event. By lowering your camera even a foot you can capture the action with this signature symbol in the frame.
These angles help you capture a miraculous moment and gain recognition in the field with unique work. By standing out and being original, you can make a name for yourself.
Sports photography is all about practice, and these six tips will help you up your game.

If you’re looking to capture eerie images with ghostly figures, then ghost photography is for you! Photographers and hobbyists have been creating spirit photos since the mid-1800s, with their popularity increasing after the civil war.
Many people believed that these photos captured the spirits of their dead relatives. Americans grieving the loss of a loved one paid a high price for the chance to be photographed and see if their dearly departed would show themselves in the photo. Flash forward a couple hundred years and ghost photography is still an in-demand and fun artform to master.
We’ll show you step-by-step how to capture photos that appear other-worldly without expensive equipment. But first, what exactly is ghost photography?

Ghost photography, also known as spirit photography, is capturing photos with images of ghosts or spirits which can appear as human forms, orbs of light, auras (like kirlian photography), and using camera settings like low shutter speeds, wide aperture, and low ISO to create fun and spooky effects in-camera.
This genre of photography has been around for hundreds of years and that gives it a rich history. The most well-known spirit photographer and the man credited with the genre’s origin is William Mumler .His photos earned him fame across the country as he “captured” the ghost of Abraham Lincoln which was so believable that even his widow Mary Todd Lincoln came to William to be photographed.
The resulting image of Mary Todd with President Lincoln standing behind her is one of the most famous spirit photographs ever taken. So how did he do it? While his exact method has never been proven, the most likely method is a double exposure.
Other famous ghost photographs include an 1800’s image that appears to have Henry VIII’s fifth wife Catherine Howard in it, The Brown Lady of Raynham Hall from 1936, the Spirit of the Terrier from 1939 showing a large dog’s faithful terrier friend that died hovering over it, and the Tulip Staircase Ghost from 1966.
With the popularity of horror movies and TV shows, people flock to filming locations and historic landmarks to recreate scenes and try to capture spirits. And why not? It’s a fun way to practice your photography skills while learning local and national history. So let's learn how to do ghost photography.
You cannot guarantee a spirit will show up for a photoshoot, but you can create ghost photos with a bit of creativity and planning. First is the right camera gear. To do ghost photography you’ll need a:
Once you have your equipment ready, it’s time to have some fun!
There are three main types of ghost photographs:
Here’s how to capture each one, step by step.
Lots of times the ghosts in photos appear as bright balls of light known as orbs or backscatters. These are mainly particles of dust that aren’t seen by the naked eye but reflect the light of the camera flash.
Here’s how you can create these fun ghostly images:.

Historic buildings are prime places to stage spooky shoots, and there are LOTS of ways to dial up the ghostly vibes.
Start with the same settings as above, but consider adding your own elements to the scene, like out-of-place paintings or objects. Invite a friend to wander through the frame during exposure to capture their ghostly image. You can even bring additional light sources to add strange visual phenomena to your shot.
Another method is to use dry ice or anything that emits vapor to create a ghostly mist in your photo, like the one below. Position the dry ice by a window, on the roof, or somewhere where the wind can blow it across the area you’re photographing.

For photos that appear to have a full-body apparition, you’ll use the same equipment as above minus the flash, and you’ll be shooting with long exposures.
Experiment with different exposure times and see what other effects you can create.

That’s it! Now you know how to create your own ghostly images and master the art of ghost photography. So if you’ve been stuck in a rut or just want to try something new, give ghost photography a shot.

Have you ever seen a photo and wondered how the photographer managed to capture such vibrant color, or was able to tone down the noise to create a crystal clear image? Chances are it was done through a process called color grading.
Table of Contents:

Color grading is the process of changing the color tone of an image by adjusting hue and saturation. By changing these elements, you can create a specific mood or add drama to your photos in ways that you can’t otherwise. This is a common technique used in both photography and film.
Color grading is often confused with color correction, but the two deal with very different kinds of adjustments or corrections. Color correction balances the colors and evens them out, making them look as true to life as possible. In the case of video, color correction can make video shot throughout the day appear as if it was all shot at the same time or in the same light.
Color grading follows color correction. It manipulates color and can change the mood of a shot. For example, if you want a shot that conveys a sense of drama, you can enhance the saturation of the color blue or red.

Before you get started in color grading, it’s good to familiarize yourself with the vocabulary terms used.
Terms
Tools
Curves: This tool can adjust the overall brightness of the image as well as the individual red, blue, and green colors.

If you’re looking to learn color grading techniques, here are the steps to get started:
The best thing that you can do if you’re new to color grading is practice. Adjust a variety of different photos and see what looks you like the best. Remember, this is your art; there is no right or wrong.
Color grading programs.
Mobile photography programs for color grading.
If you’re a mobile-first photographer, not to worry: you can also color grade photos right from your phone with special editing apps. Apps such as Snapseed, VSCO and Afterlight are just a few to get you started (available on both Android and iOS).
Color grading may seem intimidating at first glance, but it just takes some practice. It will enhance your photos and help you to create art that’s all your own.

While your camera is undeniably a technological wonder, it's not a mind reader. Even if you're cruising in full Auto mode, don't make the mistake of assuming it knows your photographic desires.
In this guide, we'll uncover five common pitfalls to steer clear of during your next shoot. Because, let's face it, even the best gadgets need a little human guidance now and then.

Your camera's got a range of automatic metering modes, saving you the hassle of manually calculating exposure. But are you picking the right one? Whether it's spot, center-weighted, or multi-zone metering, each has its use, so make sure you're familiar with them.
Take, for instance, snowy scenes. Ever snapped a pic only to find your snow looks more like sad, gray slush? Instead of trusting your camera’s meter, lean toward overexposure to capture that pristine, fluffy white snow we all know and love.
Don’t be afraid to let your inner artist run wild, either! Drown those summer portraits in light and leave in a touch of flare for a sun-soaked daydream. On the flip side, underexpose for moody clouds, mysterious shadows, and gritty urban snaps. Remember, your camera's got the tools, but you've got the vision.

Even with the reassuring beep of your autofocus, it's not foolproof. Motion blur is a common culprit, especially when the lights are low. Quick tip: make sure your shutter speed is at least 1/(focal length) if you want a shot that's sharp. If the room's a bit too dim, don't hesitate to give your ISO a little boost to compensate for the lack of light, too.
Another common culprit is when shooting wide open with those low f-stops. Your depth of field shrinks quickly, meaning it's easy to accidentally focus on your subject's nose instead of their eyes, so always double check before you press the shutter. Bokeh can create a beautiful background for a portrait, but not if you end up sacrificing sharpness where it counts.


Your camera might claim you can snap 386 more photos, but here's the truth: it's not always accurate. The actual size of each photo file depends on the complexity of the image. A serene, monochrome seascape takes up less space than a vibrant, fish-eye view of Times Square. If memory card space is a concern while you’re out and about, keep an eye on the content you're capturing.
When unsure, play it safe and pack extra memory cards. It's always better to be safe than sorry.

Ever been praised with a “Great shot! What camera was that?” If so, here's the truth: it's not the camera that's the secret, it's you! Contrary to the belief that upgrading your gear automatically improves your photography, the truth is, you don't need the newest toys to create the best images.
Whether it's a high-end DSLR or a well-loved point-and-shoot, what matters is your skill, not the brand name. Take pride in learning every button on your device and grasping fundamental principles. Case in point: the above shot? Snapped with a 4-megapixel Canon Powershot point-and-shoot.


Even if you're cruising on autopilot with auto modes, keep your brain in the game. While these modes do a stellar job in many situations, they're not infallible. Tricky scenarios like blindingly bright scenes (cue snow), deep shadows (hello, backlit subjects), or lightning-fast action can leave your camera’s auto mode a bit confused.
Before you hit that shutter button, take a beat. Consider the scene, visualize the shot you're after, and tweak your settings accordingly. Most auto modes give you the flexibility to make a few manual adjustments, so don't hesitate to play with over- or underexposure to nail the shot you're envisioning.
Even in the world of auto modes, a little manual finesse goes a long way.


